> This page is for Voice APIs.
> For clean Markdown of any page, append .md to the page URL.
> For a complete documentation index, see https://dev.hume.ai/llms.txt.
> For AI client integration (Claude Code, Cursor, etc.), connect to the MCP server at https://dev.hume.ai/_mcp/server.
# Audio
## Overview
This detailed guide explains how to be successful recording and playing back audio with EVI.
The best way to handle audio is to use the Hume AI React SDK [`@humeai/voice-react`](https://github.com/HumeAI/empathic-voice-api-js/tree/main/packages/react), which takes care of everything in this guide out of the box. If you are using the [Hume AI TypeScript SDK](https://github.com/HumeAI/hume-typescript-sdk) directly, or connecting to EVI from a different programming language, follow the instructions in this guide to handle audio recording and playback correctly.
Things to keep in mind when working with audio in EVI:
* **EVI is live.** EVI audio is streamed, not pre-recorded. With EVI, you continuously send audio in small chunks, not whole files.
* **EVI is a voice chat.** EVI depends on advanced audio processing features like echo cancellation, noise suppression, and auto gain control, which must be enabled explicitly.
* **Audio environments vary.** Your users may be using different browsers, different devices, different operating systems, different hardware, and what works in one audio environment may not work in another.
## Recording
#### Web
This section applies if you are using the [Hume TypeScript SDK](https://github.com/HumeAI/hume-typescript-sdk#readme) directly. If you are using the Hume AI React SDK ([`@humeai/voice-react`](https://github.com/HumeAI/empathic-voice-api-js/tree/main/packages/react)), please refer to Next.js sections of the [Quickstart guide](https://dev.hume.ai/docs/speech-to-speech-evi/quickstart/typescript).
### Connect to EVI
Before recording, open a WebSocket connection to the [`/v0/evi/chat`](/reference/speech-to-speech-evi/chat#) endpoint. For more context, see the [TypeScript quickstart guide](/docs/speech-to-speech-evi/quickstart/typescript#authenticate-1).
```typescript
import { Hume, HumeClient } from 'hume';
const client = new HumeClient(...);
const socket = await client.empathicVoice.chat.connect(...);
```
**Client-side, not server-side** - Typically, you should open the WebSocket connection to EVI on the *client-side*: either from your web frontend in JavaScript that runs in the user's browser, or from inside your mobile app, because the server-side does not have direct access to the user's microphone. Connecting to EVI from your backend is possible, but in this case you will have to transmit audio from the user's device to your backend, and then from your backend to EVI, which will add latency.
**WebSocket before Microphone** - Connect to the EVI WebSocket *before* you start recording from the microphone. Audio formats like `wav` and `webm` begin with a header that you must transmit in order for EVI to be able to interpret the audio correctly. If the WebSocket connection is not ready when you begin recording and attempt to send the first bytes, you may inadvertently cut off the header.
### Determine the audio format
Different browsers support sending different audio formats, described by MIME types. Use the [`getBrowserSupportedMimeType`](https://github.com/HumeAI/hume-typescript-sdk/blob/main/src/wrapper/getBrowserSupportedMimeType.ts) function from the Hume TypeScript SDK to determine an appropriate MIME type.
```typescript
import {
getBrowserSupportedMimeType,
} from 'hume';
const mimeType: MimeType = (() => {
const result = getBrowserSupportedMimeType();
return result.success ? result.mimeType : MimeType.WEBM;
})();
```
### Start the audio stream
Use the [`getAudioStream` helper](https://github.com/HumeAI/hume-typescript-sdk/blob/712cf250934e0e31fccb7c9aeb85a7856c26a4a6/src/wrapper/getAudioStream.ts#L8) from the Hume TypeScript SDK. This enables echo cancellation, noise suppression, and auto gain and wraps the standard [`MediaDevices.getUserMedia`](https://developer.mozilla.org/en-US/docs/Web/API/MediaDevices/getUserMedia) web interface.
Use the [`ensureSingleValidAudioTrack` helper](https://github.com/HumeAI/hume-typescript-sdk/blob/712cf250934e0e31fccb7c9aeb85a7856c26a4a6/src/wrapper/ensureSingleValidAudioTrack.ts#L11) to make sure that there is a usable audio track. This will throw an error if there isn't a single audio track (for example, if the user doesn't have a microphone).
```typescript
import {
getAudioStream,
ensureSingleValidAudioTrack,
} from 'hume';
let audioStream = await getAudioStream();
ensureSingleValidAudioTrack(audioStream);
```
### Record, base64 encode, and transmit
Use the `MediaRecorder` API to record audio from the microphone. Inside the `.ondataavailable` handler, encode the bytes of the audio into a base64 string and send it in an [`audio_input`](https://dev.hume.ai/reference/speech-to-speech-evi/chat#send.AudioInput) message to EVI.
```typescript
import { convertBlobToBase64 } from 'hume';
let recorder = new MediaRecorder(audioStream, { mimeType });
recorder.ondataavailable = async ({ data }) => {
if (data.size < 1) return;
const encodedAudioData = await convertBlobToBase64(data);
socket.sendAudioInput({ data: encodedAudioData });
};
// capture audio input at a rate of 100ms (recommended for web)
recorder.start(100);
```
### Add support for muting
Most EVI integrations should allow the user to temporarily mute their microphone. The standard way to mute an audio stream is to send audio frames filled with empty data (versus not sending anything during mute). This helps distinguish between a muted-but-still-active audio stream and a stream that has become disconnected.
```typescript highlight={3-8}
recorder.ondataavailable = async ({ data }) => {
if (data.size < 1) return;
if (isMuted) {
const silence = new Blob([new Uint8Array(data.size)], { type: mimeType });
const encodedAudioData = await convertBlobToBase64(silence);
socket.sendAudioInput({ data: encodedAudioData });
return;
}
const encodedAudioData = await convertBlobToBase64(data);
socket.sendAudioInput({ data: encodedAudioData });
};
```
The above code snippets are lightly adapted from the [EVI TypeScript Quickstart](https://github.com/HumeAI/hume-api-examples/tree/main/evi/evi-typescript-quickstart). View the full source code on GitHub to see the complete implementation.
#### iOS
Hume provides an example react-native project that contains [an Expo module with native Swift code](https://github.com/HumeAI/hume-api-examples/tree/main/evi/evi-react-native/modules/audio/ios) to handle audio recording for EVI. Even if you don't use react-native or Expo, this may be a useful reference. The below code snippets are extracted from that example project.
### Request permissions
1. Set the `NSMicrophoneUsageDescription` property in your app's `Info.plist`.
```xml highlight={4-5}
...
NSMicrophoneUsageDescription
This app uses the microphone to allow the user to talk to the EVI conversational AI interface
...
```
2. **Request permission** by calling `.requestRecordPermission` before you start recording.
```swift
let audioSession = AVAudioSession.sharedInstance()
let granted = try await audioSession.requestRecordPermission()
```
Your app should degrade gracefully if the user denies permission. Display a message that your app cannot operate properly without recording permissions, and give the user instructions how to grant the permission if it has been denied.
### Prepare the audio session
Your audio session determines which audio devices your app will use, and how your apps audio will interact with audio from other apps that might be active on your user's device.
It's worth reviewing [Apple's documentation](https://developer.apple.com/documentation/avfaudio/avaudiosession) on AVAudioSession, particularly the [`CategoryOptions`](https://developer.apple.com/documentation/avfaudio/avaudiosession/categoryoptions-swift.struct) and choosing options that make sense for your app's particular use case.
A simple example of setting up and activating the audio session looks like:
```swift
let audioSession = AVAudioSession.sharedInstance()
try audioSession.setCategory(
.playAndRecord, mode: .voiceChat,
options: [.defaultToSpeaker, .allowBluetooth, .allowBluetoothA2DP]
try audioSession.setActive(true)
// Prepares the audio hardware for emitting audio chunks of 20ms
try audioSession.setPreferredIOBufferDuration(0.02)
```
### Setting up voice processing
[`AVAudioEngine`](https://developer.apple.com/documentation/avfaudio/audio-engine) is the entry point to Apple's "advanced audio processing" audio APIs. You need to use `AVAudioEngine` in order to enable Apple's [voice processing](https://developer.apple.com/documentation/avfaudio/using-voice-processing), which includes echo cancellation. You should *not* use the simpler `AVAudioRecorder` API which does not provide this capability.
Echo cancellation prevents EVI from responding to its own voice. Echo cancellation works by subtracting elements of the signal coming from an audio output (EVI's voice, coming out of the user's speaker) from the signal that comes from the audio input (the user's microphone). Thus, you need to enable voice processing on both the input and the output for echo cancellation to work. Here is an example of how to initialize the audio engine with voice processing enabled:
```swift
let audioEngine = AVAudioEngine()
let inputNode = audioEngine.inputNode
let outputNode: AVAudioOutputNode = audioEngine.outputNode
let mainMixerNode: AVAudioMixerNode = audioEngine.mainMixerNode
audioEngine.connect(mainMixerNode, to: outputNode, format: nil)
try inputNode.setVoiceProcessingEnabled(true)
try outputNode.setVoiceProcessingEnabled(true)
```
> **Note**
>
> Note: voice processing may not work on device simulators. You should test your app on a real device to ensure that voice processing is working correctly.
>
> If you use a device simulator for development, you should use headphones, or use a mute button when you are not speaking, to prevent EVI from responding to its own speech.
### Recording and converting audio
You collect bytes from the microphone by [installing a tap](https://developer.apple.com/documentation/avfaudio/avaudionode/installtap\(onbus:buffersize:format:block:\)) on the input node.
For native apps, we recommend buffering audio into chunks with 20ms of duration.
First, use [`AVAudioNode.inputFormat`](https://developer.apple.com/documentation/avfaudio/avaudionode/inputformat\(forbus:\)) to determine a format supported by the input source, and specify that format when installing the tap. Then, use `AVAudioConverter` to convert the audio into a standard format known to be supported by EVI. While EVI supports a wide range of audio formats, converting to a single standard format will make your application easier to understand and debug. In this example, we convert to Linear 16 PCM with a sample rate of 44100. Finally, we encode the Linear 16 PCM bytes to a base64 string for transmission to EVI.
```swift
let nativeInputFormat = inputNode.inputFormat(forBus: 0)
// Multiplying by 0.02 for a buffer size of 20ms
let inputBufferSize = UInt32(nativeInputFormat.sampleRate * 0.02)
let desiredInputFormat = AVAudioFormat(commonFormat: .pcmFormatInt16, sampleRate: 44100, channels: 1, interleaved: false)!
inputNode.installTap(
onBus: 0,
bufferSize: inputBufferSize,
format: nativeInputFormat
) { (buffer, time) in
let convertedBuffer = AVAudioPCMBuffer(
pcmFormat: desiredInputFormat,
frameCapacity: 1024
)!
let inputAudioConverter = AVAudioConverter(
from: nativeInputFormat,
to: desiredInputFormat
)!
var error: NSError? = nil
let status = inputAudioConverter.convert(
to: convertedBuffer,
error: &error,
withInputFrom: {inNumPackets, outStatus in
outStatus.pointee = .haveData
buffer.frameLength = inNumPackets
return buffer
}
)
if error != nil {
// log/report a conversion error
}
if status == .haveData {
let byteLength = Int(convertedBuffer.frameLength) * Int(convertedBuffer.format.streamDescription.pointee.mBytesPerFrame)
let audioData = Data(bytes: convertedBuffer.audioBufferList.pointee.mBuffers.mData!, count: byteLength)
let base64String = audioData.base64EncodedString()
onBase64EncodedAudio(base64String)
// base64String appropriate to send to EVI
}
}
if (!audioEngine.isRunning) {
try audioEngine.start()
}
```
> **Note**
>
> Apple also provides [`AVAudioSinkNode`](https://developer.apple.com/documentation/avfaudio/avaudiosinknode), which you can use instead of `installTap` for lower-level control over scheduling how bytes are written to the audio buffer to optimize recording latency.
### Sending audio to EVI
Linear 16 PCM is a headerless audio format, so in order for EVI to interpret the audio correctly, you must first send a [`session_settings`](https://dev.hume.ai/reference/speech-to-speech-evi/chat#send.SessionSettings) message over the chat WebSocket connection, with an [`audio` property](https://dev.hume.ai/reference/speech-to-speech-evi/chat#send.SessionSettings.audio) describing the format.
```json
{
"type": "session_settings",
"audio": {
"format": "linear16",
"sample_rate": 44100,
"channels": 1
}
}
```
Then, send [`audio_input` messages](https://dev.hume.ai/reference/speech-to-speech-evi/chat#send.AudioInput) containing the base64-encoded audio data.
```json
{
"type": "audio_input",
"audio": "..."
}
```
### Muting
Most EVI integrations will want to allow the user to temporarily mute their microphone. The standard way to mute an audio stream is to send audio frames filled with empty data (versus not sending anything during mute). This helps distinguish between a muted-but-still-active audio stream and a stream that has become disconnected.
In PCM formats, repeated 0s represent silence. The following example shows how to generate a frame of audio silence.
```swift
if isMuted {
let silence = Data(repeating: 0, count: Int(convertedBuffer.frameCapacity) * Int(convertedBuffer.format.streamDescription.pointee.mBytesPerFrame))
let base64String = silence.base64EncodedString()
// send the base64 string of silence in an `audio_input` message to EVI
// instead of the bytes passed into the `installTap` block.
}
```
## Playback
At a high level, to play audio from EVI:
* **Listen for [`audio_output`](/reference/speech-to-speech-evi/chat#receive.AudioOutput) messages** from EVI and base64 decode them.
* **Implement a queue** to store audio segments from EVI. Audio from EVI can arrive faster than it is spoken, so EVI will cut itself off if you play audio segments as soon as they arrive.
* **Handle interruptions.** You should stop playing the current audio segment and clear the queue when the [`user_interruption`](/reference/speech-to-speech-evi/chat#receive.UserInterruption) or [`user_message`](/reference/speech-to-speech-evi/chat#receive.UserMessage) events are received.
#### Web
### Receive audio
After connecting to EVI, listen for [`audio_output`](/reference/speech-to-speech-evi/chat#receive.AudioOutput) messages. Audio output messages have a `data` field that contains a base64-encoded WAV file. In a browser environment, you can use the [`convertBase64ToBlob`](https://github.com/HumeAI/hume-typescript-sdk/blob/cecbe706368c497ef8db0e8e0b51e3ee7c396374/src/wrapper/convertBase64ToBlob.ts#L8) function from the Hume TypeScript SDK to convert the base64 string to a [`Blob`](https://developer.mozilla.org/en-US/docs/Web/API/Blob) object.
```typescript
socket.on('message', (message) => {
switch (message.type) {
case 'audio_output':
const blob = convertBase64ToBlob(message.data);
...
}
})
```
### Play the audio from a queue
EVI can generate audio segments faster than they are spoken. Instead of playing the audio segments directly, you should place them into a queue on receipt.
To play an audio segment, convert the Blob to an [Object URL](https://developer.mozilla.org/en-US/docs/Web/API/URL/createObjectURL_static) use the [`Audio`](https://developer.mozilla.org/en-US/docs/Web/API/HTMLAudioElement/Audio) constructor from object from the browser's HTMLAudioElement API, and call `.play`. Use the `.onended` listener to know when the segment has completed and play the next segment in the queue.
```typescript
const audioQueue: Blob[] = [];
// Keep track of the currently-playing audio so it can
// be stopped in the case of interruption
let currentAudio: HTMLAudioElement | null = null;
function playAudio() {
if (!audioQueue.length || isPlaying) return;
isPlaying = true;
const audioBlob = audioQueue.shift();
if (!audioBlob) return;
const audioUrl = URL.createObjectURL(audioBlob);
currentAudio = new Audio(audioUrl);
currentAudio.play();
currentAudio.onended = () => {
isPlaying = false;
if (audioQueue.length) playAudio();
};
}
```
```typescript highlight={4-5}
switch (message.type) {
case 'audio_output':
const blob = convertBase64ToBlob(message.data);
audioQueue.push(blob);
if (audioQueue.length >= 1) playAudio();
...
}
```
### Handle interruption
EVI produces a [`user_interruption`](/reference/speech-to-speech-evi/chat#receive.UserInterruption) event if it detects that the user intends to speak while it is generating audio. However, it is also possible that a user will speak after EVI has finished generating audio for its turn, but before the audio has finished playing inside the browser. In this case, EVI will not produce a [`user_interruption`](/reference/speech-to-speech-evi/chat#receive.UserInterruption) event but will produce a [`user_message`](/reference/speech-to-speech-evi/chat#receive.UserMessage) event. In both cases, you should stop the currently playing audio and empty the queue.
```typescript highlight={2-8,12-19}
switch (message.type) {
case 'user_interruption':
stopAudio();
break;
case 'user_message':
stopAudio();
// Any additional handling for user messages
break;
...
}
function stopAudio(): void {
currentAudio?.pause();
currentAudio = null;
isPlaying = false;
// clear the audioQueue
audioQueue.length = 0;
}
```
### Enable verbose transcriptions to prevent interruption delays
By default, [`user_message`](/reference/speech-to-speech-evi/chat#receive.UserMessage) events are only sent after the user has spoken for enough time to generate an accurate transcript. This can result in a perceptible delay in the user's ability to interrupt EVI during the period when EVI is done generating its audio for the turn but before the browser has finished playing it.
To address this, you should set the query parameter `verbose_transcription=true` when opening the WebSocket connection to the [`/v0/evi/chat`](/reference/speech-to-speech-evi/chat#) endpoint. This will cause EVI to send "interim" user messages, with an incomplete transcript, as soon as it detects that the user is speaking.
You should use these interim messages to stop the currently playing audio and clear the queue. Modify any other logic that uses
the transcript from [`user_message`](/reference/speech-to-speech-evi/chat#receive.UserMessage) events to either ignore messages
with `interim: true`, or take into account how several interim
messages transcribing the same segment of speech may be sent before
the final message.
```typescript highlight={3,9-14}
socket = client.empathicVoice.chat.connect({
...,
verbose_transcription: true,
})
switch (message.type) {
...
case 'user_message':
stopAudio();
if (message.interim) {
// ignore interim messages for any handling
// of transcriptions
break;
}
// Any additional handling for user messages
break;
...
}
```
### Using the `EVIWebAudioPlayer` for advanced playback
For a more advanced audio playback experience, you can use the `EVIWebAudioPlayer`, a cross-browser audio player. This player is designed for sequential, glitch-free audio playback, offering efficient handling of audio queues, volume control, and real-time Fast Fourier Transform (FFT) for visualization.
The player has a dedicated AudioWorklet Mode (default) and Regular Buffer Mode that uses `AudioBufferSourceNode` on the main thread.
> **Note**
>
> The EVI web audio player must be initialized after audio capture begins. Make sure you start recording audio before calling `player.init()`.
#### Initialization
First, create an instance of `EVIWebAudioPlayer` and initialize it. The `init()` method must be called within a user gesture (e.g., a button click) to comply with browser autoplay policies.
The `disableAudioWorklet` option can be used to explicitly disable AudioWorklet Mode and use Regular Buffer Mode (`AudioBufferSourceNode`). Regular Buffer Mode is recommended if you're hearing distortion in the default mode (for reference, see [this Safari 17.5 regression](https://github.com/WebKit/WebKit/pull/29048)).
```typescript
import { EVIWebAudioPlayer } from 'hume';
const player = new EVIWebAudioPlayer({
volume: 0.8, // Set initial volume
// disableAudioWorklet: true // Optional: defaults to false
});
// Call init() within a user gesture
document.getElementById('startButton')?.addEventListener('click', async () => {
try {
await player.init();
console.log('EVIWebAudioPlayer initialized.');
} catch (error) {
console.error('Failed to initialize EVIWebAudioPlayer:', error);
}
});
```
#### Enqueuing Audio
Once initialized, you can enqueue `audio_output` messages received from EVI. The player will automatically manage the queue and ensure playback.
```typescript
socket.on('message', async (message) => {
switch (message.type) {
case 'audio_output':
await player.enqueue(message);
break;
// ... other message types
}
});
```
#### Handle interruption
EVI produces a [`user_interruption`](/reference/speech-to-speech-evi/chat#receive.UserInterruption) event if it detects that the user intends to speak while it is generating audio. However, it is also possible that a user will speak after EVI has finished generating audio for its turn, but before the audio has finished playing. In this case, EVI will not produce a [`user_interruption`](/reference/speech-to-speech-evi/chat#receive.UserInterruption) event but will produce a [`user_message`](/reference/speech-to-speech-evi/chat#receive.UserMessage) event.
Although EVI halts response generation when interrupted, the user won't experience the interruption unless the assistant's voice also stops. To make the interruption perceptible, the client must stop audio playback by calling `player.stop()`, which stops the currently playing audio and clears the queue.
```typescript
import type { SubscribeEvent } from 'hume/api/resources/empathicVoice/resources/chat';
socket.on('message', async (message: SubscribeEvent) => {
switch (message.type) {
case 'audio_output':
await player.enqueue(message);
break;
case 'user_interruption':
player.stop();
break;
case 'user_message':
player.stop();
// Any additional handling for user messages
break;
// ... other message types
}
});
```
#### Handling Events
The `EVIWebAudioPlayer` emits various events (`play`, `stop`, `fft`, `error`) that you can subscribe to for real-time feedback and control.
```typescript
player
.on('play', (e) => console.log('Playback started for:', e.detail.id))
.on('stop', (e) => console.log('Playback stopped for:', e.detail.id))
.on('fft', (e) => {
// Use e.detail.fft for real-time audio visualization
// console.log('FFT data:', e.detail.fft);
})
.on('error', (e) => console.error('Player error:', e.detail.message));
```
#### Controlling Playback
You can control the player's volume, mute/unmute, and stop playback.
```typescript
// Set volume
player.setVolume(0.5);
// Mute/unmute
player.mute();
player.unmute();
// Stop playback and clear the queue
player.stop();
```
#### iOS
### Enqueue audio
After connecting to EVI, listen for [`audio_output`](/reference/speech-to-speech-evi/chat#receive.AudioOutput) messages on the WebSocket. EVI can generate audio segments faster than they are spoken. Instead of playing the audio segments directly, you should place them into a queue on receipt.
Audio output messages have a `data` field that contains a base64-encoded WAV file. Use the [`Data`](https://developer.apple.com/documentation/foundation/data) class to convert the base64 string to a `Data` object to place into the queue.
```swift
private var audioQueue: [Data] = []
public func enqueueAudio(_ base64String: String) async throws {
guard let data = Data(base64Encoded: base64String) else {
throw SoundPlayerError.invalidBase64String
}
audioQueue.append(data)
// If not already playing, start playback
if !isPlaying {
do {
// implemented below
try playNextInQueue()
} catch {
self.onError?(error as! SoundPlayerError)
}
}
}
```
### Play audio from the queue
The simplest way to play audio on iOS is to use Apple's [`AVAudioPlayer`](https://developer.apple.com/documentation/avfoundation/avaudioplayer) API.
Initialize an `AVAudioPlayer` with a `Data` object from the queue. To start playback, use the `.play` method to start playback.
> **Note**
>
> There is a [bug in iOS](https://forums.developer.apple.com/forums/thread/721535) that causes the audio to be set to a very low volume when `.setVoiceProcessingEnabled` is called on the output node (as recommended in the Recording section). To work around this, set the volume of the `AVAudioPlayer` to 1.0 before calling `.play`.
To know when the audio is finished playing, you need to set the `.delegate` property to an object that implements the [`AVAudioPlayerDelegate`](https://developer.apple.com/documentation/avfoundation/avaudioplayerdelegate) protocol and implement the `audioPlayerDidFinishPlaying(_:successfully:)` method.
In this example, the delegate is set to `self`, and it is the containing class that implements the `AVAudioPlayerDelegate` protocol.
```swift
public class SoundPlayer: NSObject, AVAudioPlayerDelegate {
public func enqueueAudio(_ base64String: String) async throws {
// Implemented above
...
}
private var isPlaying: Bool = false
private func playNextInQueue() throws {
guard !audioQueue.isEmpty else {
isPlaying = false
return
}
isPlaying = true
let data = audioQueue.removeFirst()
self.audioPlayer = try AVAudioPlayer(data: data, fileTypeHint: AVFileType.wav.rawValue)
self.audioPlayer!.delegate = self
// See https://forums.developer.apple.com/forums/thread/721535
self.audioPlayer!.volume = 1.0
let result = audioPlayer!.play()
}
public func audioPlayerDidFinishPlaying(_ player: AVAudioPlayer, successfully flag: Bool) {
do {
try playNextInQueue()
} catch {
// Handle errors
}
}
}
```
> **Note**
>
> `AVAudioPlayer` is simple to get up and running, but instantiating a new `AVAudioPlayer` for each audio segment, and readjusting the volume each time, is inefficient. It can also be necessary to readjust the playback device.
>
> For a smoother playback experience, you should use Apple's more advanced APIs for playing back audio. You can attach [an `AVAudioPlayerNode`](https://developer.apple.com/documentation/avfaudio/avaudioplayernode) to the `mainMixerNode` in your `AVAudioEngine` chain and use the [`scheduleBuffer` method](https://developer.apple.com/documentation/avfaudio/avaudioplayernode/schedulebuffer\(_:completionhandler:\)) to play audio segments.
>
> For even finer-grained control, you can use the [`AVSourceNode`](https://developer.apple.com/documentation/avfaudio/avaudiosourcenode) API, and write bytes directly to the audio buffer.
### Handle interruption
EVI produces a [`user_interruption`](/reference/speech-to-speech-evi/chat#receive.UserInterruption) event if it detects that the user intends to speak while it is generating audio. However, it is also possible that a user will speak after EVI has finished generating audio for its turn, but before the audio has finished playing inside the browser. In this case, EVI will not produce a [`user_interruption`](/reference/speech-to-speech-evi/chat#receive.UserInterruption) event but will produce a [`user_message`](/reference/speech-to-speech-evi/chat#receive.UserMessage) event. In both cases, you should stop the currently playing audio and empty the queue, with code like the below:
```swift
public func stopPlayback() {
self.audioPlayer?.stop()
self.audioPlayer = nil
self.audioQueue.removeAll()
isPlaying = false
}
```
### Enable verbose transcriptions to prevent interruption delays
By default, [`user_message`](/reference/speech-to-speech-evi/chat#receive.UserMessage) events are only sent after the user has spoken for enough time to generate an accurate transcript. This can result in a perceptible delay in the user's ability to interrupt EVI during the period when EVI is done generating its audio for the turn but before the browser has finished playing it.
To address this, you should set the query parameter `verbose_transcription=true` when opening the WebSocket connection to the [`/v0/evi/chat`](/reference/speech-to-speech-evi/chat#) endpoint. This will cause EVI to send "interim" user messages, with an incomplete transcript, as soon as it detects that the user is speaking.
You should use these interim messages to stop the currently playing audio and clear the queue. Modify any other logic that uses
the transcript from [`user_message`](/reference/speech-to-speech-evi/chat#receive.UserMessage) events to either ignore messages
with `interim: true`, or take into account how several interim
messages transcribing the same segment of speech may be sent before
the final message.
### Handling complex audio scenarios
Users sometimes have multiple audio devices, play audio from multiple sources, or unplug devices while your app is in use. You should think about how your app should behave in these more complex scenarios. The answer to these questions will vary based on the purpose of your app, but here is a list of scenarios you should consider:
* **Graceful permission handling** - Always check for audio permissions before starting to record audio. If the user has not granted permission, display an appropriate message and give the user instructions how to grant the permission.
* **Device selection** - Simple EVI integrations can hardcode the default microphone and audio playback device. Consider what to do when there are multiple devices available. Should you default to headphones, if they are available? Should you allow the user to select a device?
* **Device unavailability** - Users unplug audio devices, or revoke permission to record audio. In this case, fall back to a different audio device if appropriate, or pause the chat and display a message to resume.
* **Background audio** - If you are building a mobile app, does it make sense for your app to be able to play audio in the background (for example, if the user switches apps to go look something up in a web browser)? What should happen when the user starts a chat but there is already audio playing in the background (listening to music, perhaps), should your app interrupt it?
## Understanding digital audio
A common source of issues when building with EVI is malformed or unsupported audio. This section explains what audio formats EVI supports, gives some conceptual background on how to understand digital audio more generally, and gives some advice for how to troubleshoot audio-related issues.
### Audio formats
Hume attempts to accommodate the widest range of audio formats supported by our tools and partners. However, we recommend converting to one of the industry's most commonly supported audio formats for the sake of your own troubleshooting. Two excellent choices are:
* **Linear PCM** - A simple format for uncompressed audio that is easy to convert to and is supported by most audio processing tools.
* **Audio/webm** - This format is a web standard that allows sending compressed audio. It is supported by most browsers.
### Audio/WebM
WebM is a container format that contains compressed audio, supported by all modern browsers.
A WebM audio stream **begins with a header** that identifies the stream as being WebM, with metadata describing the codec with which the audio is compressed and other details about the audio, such as the sample rate. If you are sending audio in the WebM format (or any format with a header), **take care not to cut off the header**. Avoid starting the audio stream when the WebSocket connection is not open. If you have implemented a mute button, test what happens when the chat starts while mute is enabled.
### Linear PCM
PCM (pulse-code modulation) is a method of representing audio as a sequence of "samples" that capture the amplitude of the audio signal at regular intervals. PCM actually describes a family of different representations that vary along several dimensions: sample rate, number of channels, bit depth, and more. You must communicate these details to EVI in order for EVI to be able to interpret the audio correctly. PCM is a headerless format, so there is no way to communicate these details in the stream of audio data itself. Instead, **you must send a [`session_settings`](/reference/speech-to-speech-evi/chat#send.SessionSettings) message specifying the sample rate, the number of channels, and an encoding**. Presently, the only supported encoding is `linear16`, which is the most common. It describes a linear quantized PCM encoding where each sample is a 16-bit signed, little-endian integer.
```json
{
"type": "session_settings",
"audio": {
"format": "linear16",
"sample_rate": 44100,
"channels": 1
}
}
```
Ensure the details you specify in the [`session_settings`](/reference/speech-to-speech-evi/chat#send.SessionSettings) message match the actual audio you are sending. If the sample rate is incorrect, the audio may be distorted but still intelligible, which could interfere with EVI's emotional analysis. It's difficult to understand your user's subtle emotional cues if they sound like Alvin and the Chipmunks.
### Non-supported formats
[Mulaw (or μ-law)](https://en.wikipedia.org/wiki/%CE%9C-law_algorithm) is a non-linear 8-bit PCM encoding that is commonly used in telephony, for example, it is used by [Twilio Media Stream API](https://www.twilio.com/docs/voice/media-streams/websocket-messages#send-a-media-message). **This encoding is *not* presently supported by EVI.** If you are receiving audio from a telephony service that uses mulaw encoding, you will need to convert.
### Clicking
"Clicking" occurs when there is a discontinuity in the audio waveform. While segments received from EVI are continuous, you may hear a click if you stop audio playback abruptly, for example, when a user interruption occurs. You can eliminate the clicks by implementing a brief fadeout effect when stopping playback.
### Troubleshooting audio
Audio issues can surface in several different ways:
* **Transcription errors** - you may see an error message over the chat WebSocket like
```json
{"type":"error","code":"I0118","slug":"transcription_disconnected","message":"Transcription socket disconnected."}
```
followed by the chat ending. This results from an error that happened while attempting to transcribe speech from the audio you sent, and often indicates that the audio is malformed.
* **Unexpected silence** - Another failure mode is when you send [`audio_input`](/reference/speech-to-speech-evi/chat#send.AudioInput) messages, the user is speaking, but you do not receive any messages back, neither `user_message`, nor `assistant_message`. This can happen when EVI believes it has successfully decoded the audio, but has assumed the wrong format, and while the bytes of your audio would contain speech if decoded in the correct format, they appear to be static or silence when decoded incorrectly.
Once you have observed a behavior that could indicate an audio issue, you can troubleshoot by directly inspecting the [`audio_input`](/reference/speech-to-speech-evi/chat#send.AudioInput) messages your application sends to EVI and attempt to decode it and play it back yourself.
You can find this by adding log statements to your application, or from the `Network` tab of your browser's developer tools.
### Observe outgoing Session Settings and Audio Input messages
If your application runs in a web browser, you can view all the transmitted WebSocket messages. Open the developer tools, navigate to the `Network` tab, filter for `WS` (WebSockets), select the request to [`/v0/evi/chat`](/reference/speech-to-speech-evi/chat#), select `Messages` (sometimes called `Frames`), and click on a message to see its value.
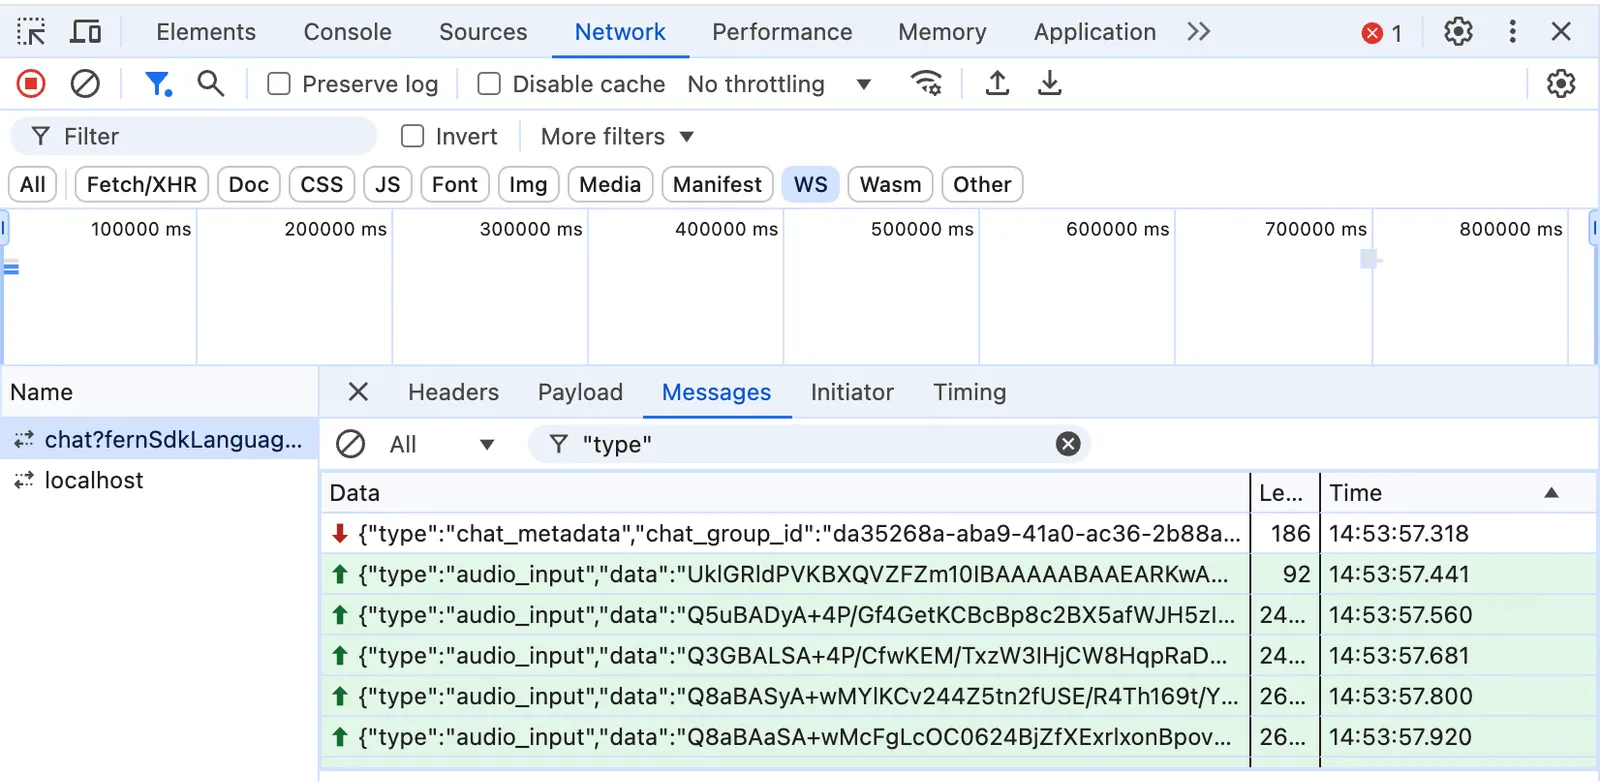
If your application is running on a server or a mobile device, you should add an appropriate log statement to your code so that you can observe the messages being sent to EVI.
### Extract the audio data
Copy the value of the `.data` property in the first `audio_input` message your application sends. Paste it into your favorite text editor and save it into a temporary file `/tmp/audio_base64`. Then, use the `base64` command to decode the base64 string into a binary file:
```bash
cat /tmp/audio_base64 | base64 -d > /tmp/audio
```
### Analyze the audio
Download and install the [FFmpeg](https://www.ffmpeg.org/download.html) command-line tool. (`brew install ffmpeg`, `apt install ffmpeg`, etc.) FFmpeg comes with a secondary command `ffprobe` for inspecting audio files. The `ffprobe` command is useful for audio formats that have headers, like WebM. Run `ffprobe /tmp/audio` to inspect the audio file, and if the audio is valid WebM, the output should include a line like
```txt
Input #0, matroska,webm, from 'output.webm':
```
The `ffprobe` command is less useful for audio in raw formats like PCM, because technically any bytes can be validly interpreted as any raw audio format. You could even attempt to play a non-audio file like a `.pdf` as raw PCM: it will just sound like static. The only reliable way to analyze raw audio is to attempt to play them back. FFmpeg comes with a secondary command `ffplay` for playing audio.
To play linear16 PCM audio (the only raw format that EVI supports), run the command `ffplay -f s16le -ar -ac /tmp/audio`, replacing `` and `` with the values you specified in the `session_settings` message. If the audio is valid, you should hear the audio you recorded and attempt to send to EVI.
If you hear distorted audio, you may have specified the wrong sample rate or number of channels. If you hear static or silence, then the audio is likely *not* in the linear16 PCM format that EVI expects. In this case, you should add conversion step to your source code, where you explicitly convert the audio to the expected format. If you are unsure of the format that is being produced, you can experiment trying to play back with different [PCM formats](https://ffmpeg.org/ffmpeg-formats.html#Raw-PCM-muxers) by changing the `-f` flag to `s8`, `s16be`, `s24le`, etc.